How to create Airbnb “Lava” style icons - step-by-step guide 2025
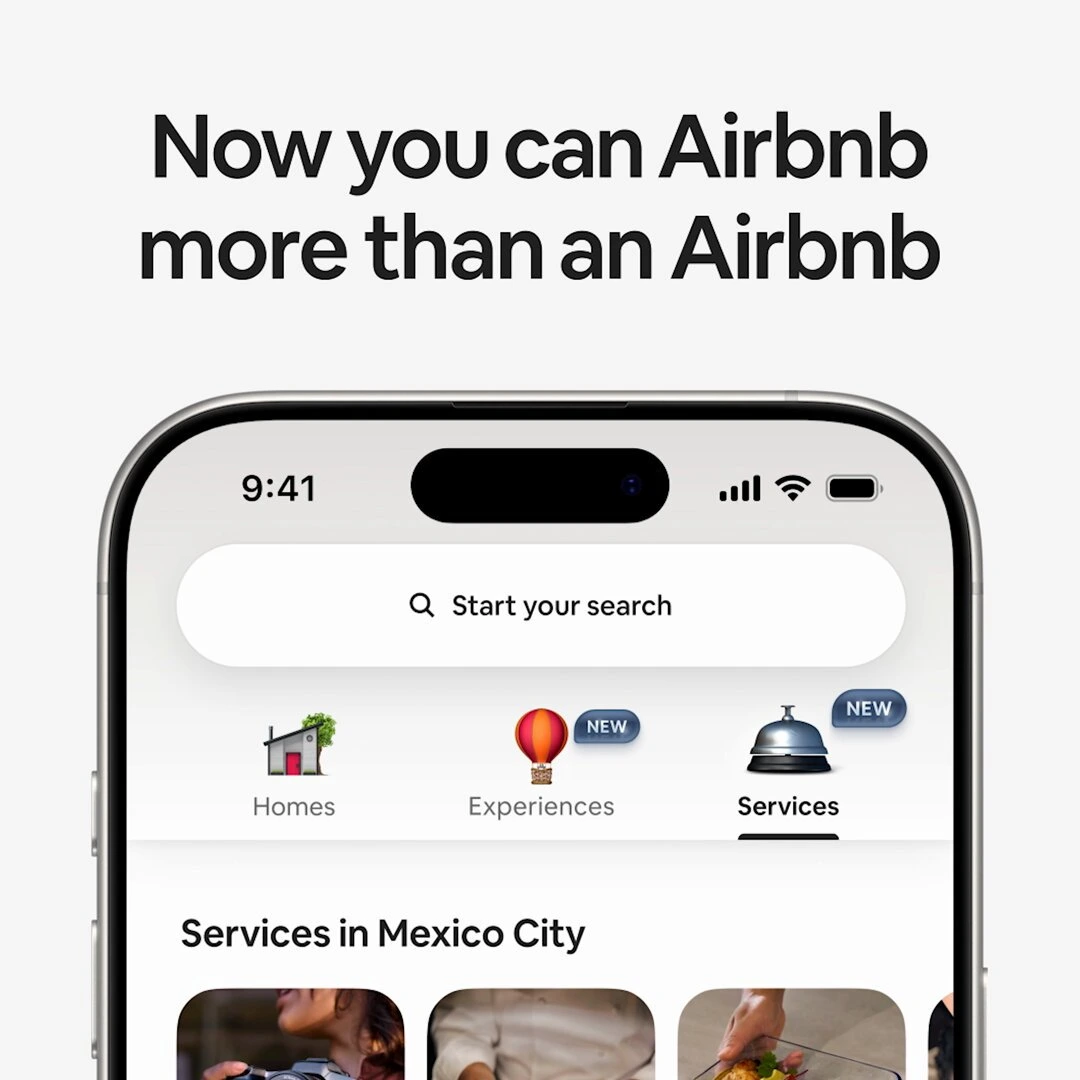
Airbnb’s May 2025 redesign introduced “Lava,” a proprietary micro-video format that brings 3D icons to life with transparency and high-performance playback. Unlike static images or 2D vector animations, Lava icons offer true depth, smooth motion, and seamless integration across platforms. This guide walks UI designers through every phase - from concept, 3D modeling, animation, rendering and encoding to integration so you can create rich, lightweight icon animations that delight users.
Understanding the Lava format
At its heart, Lava is a micro-video format built specifically for UI icons. Conceptually, it behaves like a short video with an alpha channel, but its encoding is fine-tuned for simple 3D objects rather than full-motion footage. Each .lava file contains a sequence of rendered frames plus transparency data, all compressed using delta encoding and custom quantization. This keeps file sizes down—often under 500 KB for a two-second loop—while preserving full 32-bit color and smooth playback. Crucially, Airbnb provides a unified SDK that decodes and renders Lava files identically on web, iOS, and Android, bypassing inconsistencies in native video support. In practice, designers create and export a sequence of PNG frames, then pass them through the Lava encoder to produce the final .lava asset. From there, developers drop the file into their UI and invoke simple playback controls.
Step 1: Define your icon concept
Every great Lava icon starts with a clear concept. This phase sets the foundation for all that follows.
1. Identify the Purpose
Ask yourself: What function or message will this icon convey? Is it a confirmation checkmark, a search magnifier, or a whimsical hot-air balloon to celebrate an onboarding milestone? The clearer you are about purpose, the more focused your animation will be.
2. Establish Emotional Tone
Icons carry personality. A booking success icon might give a confident bounce, while an error icon could shake subtly. Decide whether your icon should feel friendly, energetic, reassuring, or playful. This emotional layer lends coherence to your brand voice.
3. Sketch Key Poses
Before jumping into 3D, do quick 2D sketches of three to five key frames: the start, midpoints, and end of your loop. These rough illustrations guide your 3D animator’s eye, ensuring that the motion timing and transitions align with your vision.
4. Define Loop Length and Speed
Typical Lava loops run two to three seconds at 24 or 30 frames per second—that’s 48 to 90 frames. Short loops load faster; longer loops risk larger file sizes. Balance expressiveness with efficiency by aiming for a crisp, memorable motion that doesn’t overstay its welcome.
5. Create a Mood Board
Collect inspiration from existing micro-animations, 3D renders, and real-world objects. Pay attention to proportions, color palettes, and lighting styles that resonate with your brand. Mood boards keep your aesthetic consistent throughout the design process.
Step 2: Model your icon in 3D
With a solid concept in place, it’s time to translate your sketches into a three-dimensional model.
1. Choose a 3D Tool
While professional studios use Maya or Cinema 4D, Blender is an excellent free alternative with robust modeling and animation capabilities. Select whichever tool you’re comfortable with or eager to learn.
2. Start with Simple Geometry
Block out your icon using low-poly shapes—cubes, spheres, and planes. Low-poly designs render faster and look crisp at icon sizes. If you need finer detail, plan to bake high-poly sculpted details into textures or normal maps.
3. Apply Basic Materials
Keep shaders simple: flat colors, gentle specular highlights, or basic gradients. Complex textures and procedural materials increase render times and may not translate well in small icon views. Consistency in material quality across icons fosters a unified look.
4. Set Up Lighting
A standard three-point lighting setup (key light, fill light, and rim light) provides depth and form. Position your key light to establish the primary illumination, a secondary fill light to soften shadows, and a subtle back or rim light to outline the silhouette. If you prefer a more organic feel, use a high-dynamic-range (HDR) environment map, but test render times carefully.
5. Position the Camera
Frame your icon to fit comfortably within the intended pixel dimensions, such as 200×200 pixels. An orthographic camera prevents perspective distortion, while a slightly angled perspective camera can add dynamism. Choose based on your motion goals and the icon’s role.
Step 3: Animate a smooth loop
Animation brings your icon to life. Smooth loops require attention to timing, easing, and continuity.
1. Identify Core Motion
Decide which property will animate: position for bounces, rotation for spins, or scale for pulses. Keep the motion simple and deliberate. Overly complex paths can distract at small sizes.
2. Set Keyframes Thoughtfully
Place keyframes at structural points in your motion—apex of a bounce, midpoint of a rotation, or peak of a pulse. Use your initial sketches as a guide to ensure the animation follows the narrative you envisioned.
3. Match the Start and End Frames
Seamless loops depend on identical start and end states. Check that your final keyframe mirrors your initial one in every transform channel: position, rotation, scale, and any material parameters like color or emission.
4. Ease In and Ease Out
Avoid linear interpolations that create robotic motion. Apply easing curves—slow start, quick middle, slow end—or custom Bezier curves to mimic natural acceleration and deceleration. This subtlety gives your icon a polished feel.
5. Add Secondary Motion Sparingly
Tails, flaps, or secondary bounces enrich motion but also complicate rendering. Introduce only a hint of follow-through—like a slight lag on a flag’s tip or a small overshoot on a bounce—so the icon feels alive without becoming heavy.
6. Preview Frequently
Use quick, low-quality playblasts or viewport previews to review timing. Make adjustments early before committing to full-quality renders. This iterative feedback loop saves hours on re-rendering.
Step 4: Render your animation to transparent frames
Rendering with full alpha preservation is critical to seamless overlay in user interfaces.
1. Choose an RGBA Image Sequence
Export each frame as a transparent PNG. PNG supports lossless compression and an alpha channel, making it ideal for preserving crisp edges and transparency in small icons.
2. Match Your Frame Rate
Set your render settings to match your animation’s FPS—commonly 24 or 30. Consistency between animation and render prevents dropped frames or timing mismatches.
3. Set Resolution and Aspect Ratio
Use a square canvas—200×200 pixels is a popular standard, but you may adjust to your UI’s needs. Squared frames ensure consistent scaling and alignment in grid layouts.
4. Organize Your Output
Name frames sequentially (for example, icon_0001.png, icon_0002.png, …) and store them in a dedicated folder. Clear organization simplifies batch encoding and future revisions.
5. Inspect for Artifacts
Before moving to encoding, examine key frames in an image viewer. Look for unexpected background colors, haloing at the edges, or compression artifacts. Fixing issues at this stage prevents wasted encoding cycles.
Step 5: Encode to the Lava format
Once you have a clean PNG sequence, it’s time to package your animation into a .lava file.
1. Install Airbnb’s Lava Encoder
When released, the Lava encoder will be a simple command-line tool installable via npm, Brew, or a direct download. Follow Airbnb’s documentation for setup.
2. Configure Encoding Settings
Point the encoder at your frames folder, enable looping, and choose default quality settings. Quality presets—such as “high,” “medium,” and “low”—balance fidelity and file size.
3. Execute the Encode
Run the encode command. The encoder applies delta frame compression (storing only changed pixels between frames) and custom quantization tuned for flat colors and simple gradients. This typically yields a .lava file under 500 KB for a two-second animation.
4. Validate the Output
Use the provided Lava preview tool or a test HTML sandbox to confirm that your icon loops smoothly, plays at the correct speed, and retains transparency on various backgrounds.
5. Prototype with Alternatives
While awaiting the official encoder, prototype by assembling your PNGs into an alpha-enabled WebM or APNG. These larger files let you test integration and player controls before swapping in the final .lava asset.
Step 6: Integrate Lava icons into your interface
With your .lava file ready, embedding animated icons becomes straightforward.
1. Add the Lava Player Library
Include Airbnb’s Lava player in your project’s asset pipeline. For web projects, add a single JavaScript or CSS file; for native apps, add the SDK via CocoaPods, Swift Package Manager, Gradle, or your preferred package manager.
2. Place the Lava Component
In your UI markup or layout editor, add a Lava player component where the icon should appear. Specify source, autoplay behavior, and looping. Position and size are controlled through standard layout properties—no special workarounds needed.
3. Control Playback Programmatically
Use simple API calls to play, pause, or seek your animation in response to user interactions. For example, pause on hover, replay on click, or sync an icon’s progress with scroll position. These controls mirror those in popular vector animation libraries, making them familiar to developers.
4. Test Across Environments
Verify playback on desktop browsers (Chrome, Safari, Firefox) and mobile devices. Check rendering performance, frame consistency, and alpha transparency. If any environment fails, ensure your fallback assets load correctly.
Tips for better Lava icons
- Aim for Brevity: Two-second loops are sweet spots.
- Use Simple Geometry: Low-poly models minimize render times.
- Limit Colors and Gradients: Flat or gently shaded surfaces compress more efficiently.
- Avoid Heavy Effects: Skip volumetric lighting and complex particles.
- Bundle Static Fallbacks: Always include a high-quality PNG version for environments without Lava support.
- Respect User Preferences: Detect reduced-motion settings and pause or replace the animation to accommodate accessibility needs.
- Version Your Assets: Maintain clear naming conventions when iterating on icon designs.
Fallbacks & accessibility
Not all platforms or users will support animated icons. Ensure inclusive experiences by providing:
- Static Icon Images: A PNG fallback that displays when animations are disabled or unsupported.
- Reduced Motion Handling: Detect
prefers-reduced-motion(on the web) or system settings (mobile) and serve the static version accordingly. - Accessible Labels: Attach descriptive labels (e.g., “Booking confirmed animation”) for screen readers so the icon’s purpose remains clear even without motion.
Troubleshooting common issues
Even a smooth workflow can hit snags. Here’s how to tackle frequent challenges:
- Black or White Backgrounds: Verify your PNG frames export with transparency and the player honors alpha channels.
- Non-Looping Animation: Ensure both your encode settings and player component enable looping.
- Oversized Files: Shorten the loop, reduce frame rate, or lower the quality preset in the encoder.
- Jittery Playback: Test on real devices, lower the FPS, or enable GPU-accelerated decoding if supported.
- Missing Assets: Double-check asset paths, bundling configurations, and that the player library loads before usage.

Performance optimization and best practices
Maximize impact while minimizing resource usage.
- Limit Loop Duration: Aim for 2 seconds or less where possible.
- Cap Frame Rate: 24 fps often suffices; reserve 30 fps for fast motion.
- Reduce Mesh Complexity: Simplify geometry to speed up initial render and reduce encoder workload.
- Minimize Texture Usage: Rely on vertex colors and simple shaders instead of heavy image textures.
- Leverage Encoder Flags: When available, experiment with different quality presets to find the best size-to-fidelity ratio.
- Lazy-Load Icons: Defer loading off-screen animations until they enter the viewport.
Examples & inspiration
- Booking Confirmation House: A small 3D house icon that gently bounces once and settles, reinforcing a successful reservation.
- Favorite Heart Pulse: A heart that expands and contracts twice, drawing attention to “saved” content.
- Loading Magnifier: A search lens that rotates 180° into a spinner, providing micro-feedback during data fetches.
All examples share the same underlying process—conceptual sketching, 3D modeling, streamlined animation, accurate rendering, optimized encoding, and robust integration.
Animated icons are no longer optional flair—they’re powerful tools for user engagement and brand differentiation. Airbnb’s Lava format unlocks the potential of 3D micro-animations while preserving performance and compatibility. By following this comprehensive guide, UI designers can plan, create, and deploy vivid Lava icons that elevate user experiences. Start experimenting with simple loops, iterate quickly, and watch static interfaces come alive with dimensional motion.

.svg)


