How to Create a Webflow Website?
What Is Webflow?
The Webflow website builder is a compelling design and web development tool that allows people with little coding knowledge to start creating their own websites. With its easy-to-use UI, responsive design, hosting services, e-commerce functionalities, template, and design element libraries, it becomes the all-in-one solution for whatever website you want to build!
Now, don't get me wrong, creating a Webflow website is not a walk in the park. Creating a website can be irritating and stressful. That is why Codelevate has become a certified professional partner of Webflow. Whether you are building a personal portfolio or a full-on e-commerce store, we are here to help you create your dream website or platform!
How to Create a Webflow Website?
Now that you know what Webflow is and what it's used for let's dive into how to create a website with Webflow. We will take you through the process of signing-in all the way to how to build a website from scratch. For a more in-depth tutorial, you can also check out the Client-First Webflow program.
Create a Webflow Account
To use the Webflow website builder, you don't need to download anything. It is a program on the web, so to start creating, you only need to create a free account. To do that, I am going to go to the Webflow main page and click the "Get started - it's free" button on the top-right corner. Webflow has made registering easy, as I am met with two choices - to use my work email given by an employer if I work at a company or through Google. The account is created automatically, so I don't need a password!
After that, Webflow will ask me some basic questions, like my name and how I intend to use Webflow. These questions are with the user in mind to create an experience accommodating the user's needs.
First Site Project
Now that I have created an account, I am given the option to complete the basic tutorial. You can complete it to get a more in-depth knowledge of the program. After completing the tutorial, I am met by the Webflow builder main page. Now, I can click the "View dashboard" button in the top right corner. In the dashboard, there is the settings menu and, more importantly, my projects. Just click the "New site" button to start a new project.
Now, I can choose between different free and paid templates to make the website creation and design more accessible. For the sake of learning, let's start with the blank site. Now that I have selected a template, I am ready to start creating!
Getting Familiar With Webflow Editor
When first opening the editor, the menus may feel overwhelming. But the Webflow design has been made simple by taking CSS and HTML elements that would take a while to learn and making them into an easy-to-use UI, so learning to use the program is very easy! Let's go through the basics!
When starting the project, there are already created presets I can choose from, which can save some time and hassle and create an arrangement of elements. I can add a layout through the "Add a Layout" button in the middle of the screen.
Now, let's look at the most important menus to become familiar with the Webflow layout. On the left, marked with a "+" sign, is the Elements menu, where I can add structures, blocks, buttons, text, media, forms, and other stuff (We will go over the elements later). Below the Elements menu is the Pages menu, where I can add pages to my website.

The menus on the right side of the screen are all about styling, or in the coding world - "CSS." There, I can change spacing, layout, fonts, sizes, and colors and create effects and animations.
Webflow Elements and How to Add Them to the Site
You can learn about all the Webflow website elements by hovering over them and clicking on the "?" icon. Let's look at some of the most essential elements that are a must.
Before that, though, you need to keep in mind that all website elements are made out of squares in squares in squares, also called "blocks." You can see that by going to any website, right-clicking, and selecting inspect. The website's code will pop up on the right of the screen. If you hover over it, you can see that every element is in a separate square. So keep that in mind when building your website.
The elements can be found in the "Add Elements" menu in the Webflow sidebar navigation marked with a "+" icon.

- Section: The section element is a "div block" that extends across the entire width of a browser window. It is aligned to the left. The Section is perfect for for background images and videos.
- Container: The container is a "div block" that has already preset styling to keep it centered in the middle of the browser window. It does not take up the full width of the screen.
- Div Block: The Div Block is a must-have in the Webflow website builder. It is the building block of the website. It is a container used to insert things like text, color, and images to make your website come to life.
- List: A list is used to keep things together, like buttons in a navigation menu.
- Button: The button is, well, A button! Use it to redirect users to other pages of your website.
Adding elements to the Webflow website is made easy with a drag-and-drop feature. I can just choose an element and drag it wherever I want to place it on the website!
Styling and polishing the website
Now that I have finished adding all the building blocks let's bring the website to life through styling! All the styling is done on the right-side Webflow sidebar navigation. Let's look at the different styling options!
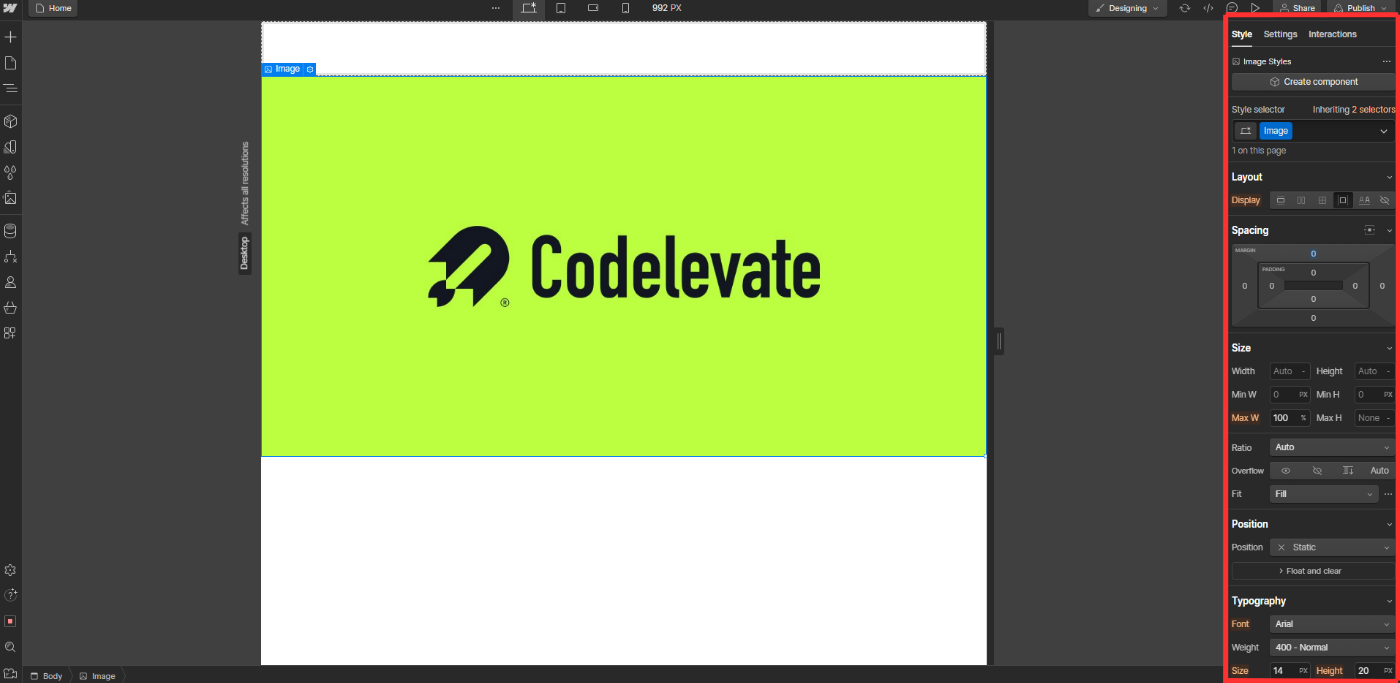
- Layout: The layout changes how the elements behave on the page - whether they are aligned to the right or the left, or one under another, etc
- The first option makes all elements in a container start on a new line and take up the full width of the screen.
- The second option allows the elements in a container to align next to each other vertically or horizontally.
- The third option allows you to align elements in a container with rows and columns - like a table!
- The fifth option makes the container only as big as to contain the elements inside it.
- The sixth option makes the element invisible.
- Spacing: The spacing changes how much space an element occupies on the website. You can adjust the spacing to the left, right, top, and bottom.
- Margin: The margin changes the space outside the border of the element.
- Padding: The padding changes the space inside the border of the element.
- Size: With this Webflow tool, you can change the height and width of the element and assign min and max height and width.
Adding new pages
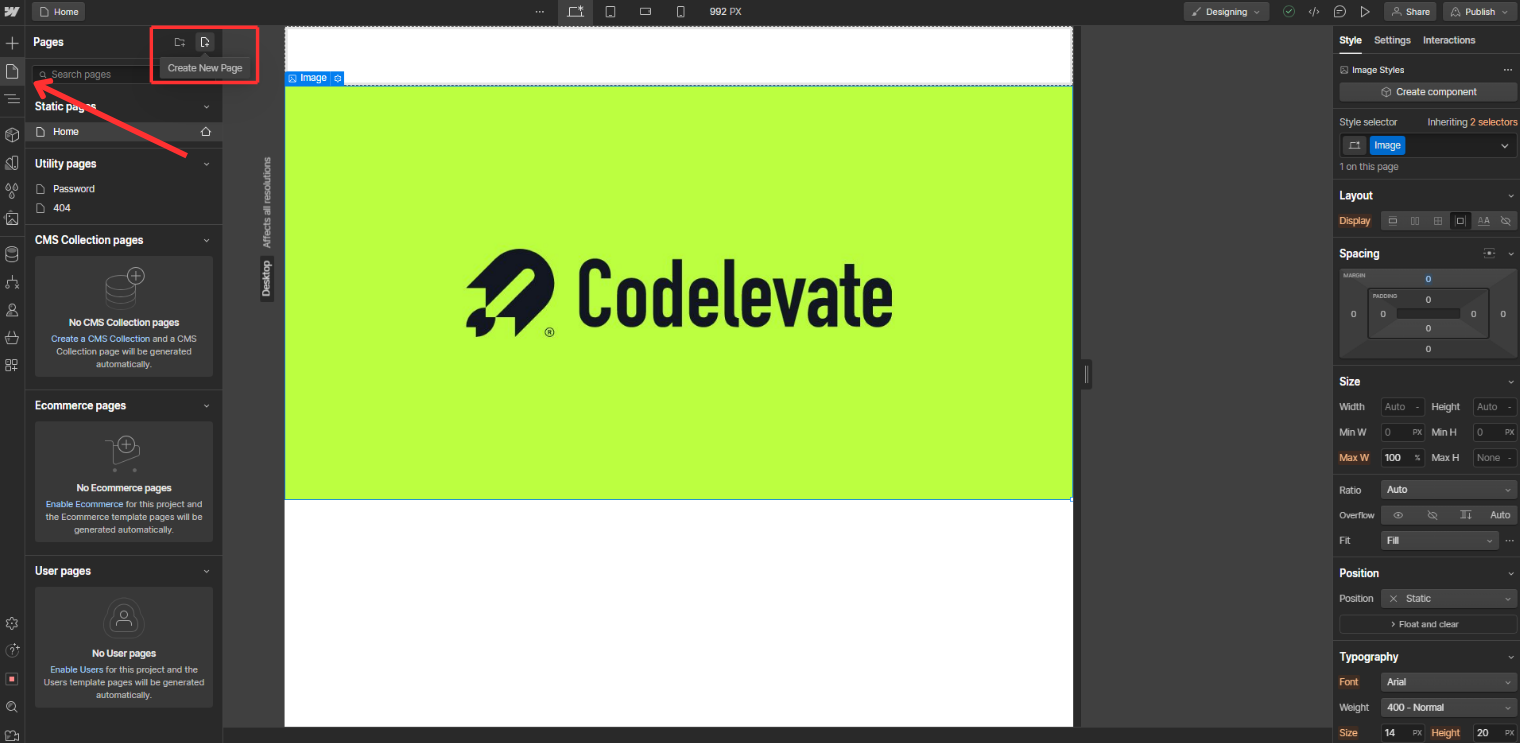
To add a new page to the project, I can open the pages tab by clicking on the paper icon on the left under the Elements menu or pressing "P" on my keyboard.
I can add a new page by clicking the "Create a new page" button. Then, I can create a name and select who has access. Then, by pressing "Create," the new page is added.
Adding Dynamic Content
Dynamic content allows the creation of database-driven elements, making it possible for your website to display varied content automatically based on user interactions, preferences, or changes in the data.
Webflow dynamic content uses CMS at its core. In this article, we are not going into what CMS is, but if you want to learn more, you can read our article about "What is CMS?".
So, I want to add Dynamic Content to my website to give users a more personalized feel. What do I do? Well, I will start by opening the "CMS Collections" tab on the left-hand side, which looks like a stack of boxes, and then click "Create New Collection." Now I need to choose a name and click "Add New Field," choose a file type, and label it. I am going to repeat this process for all the Webflow dynamic content fields I need. Now that the collection is created, I need to go back to the "CMS Collections" tab, select the collection I just created, click on "Create new item," fill in the content I want displayed and save. I will repeat this for all the content I want to display dynamically.
Now that my collection is complete, I must add it to my website. To do that, I just need to return to my canvas and drag the collection onto the website from the "Add Elements" tab. Then, I have to link each element to a field from my collection to add the dynamic content to the website.

Previewing and Publishing the Website
The Webflow app builder has made it very easy to see what the website would look like when published. To do that, I only need to click the "Toggle Preview" button that looks like a "play" button on the top right-hand corner. An essential thing for a website is, of course, for it to work on different devices. That is why, on the top center of the screen, I can select a tablet or a phone and see what my website would look like on different devices. Checking the website compatibility on different display sizes is crucial because the website could look perfect on my PC display. Still, when I open it on my phone - it breaks completely because the Webflow image size or element size has changed.
Now that I am done with my beautiful website, I want to publish it for the world to see. To launch my website, I just click "Publish" in the top-right corner and click "Publish to Selected Domains." Now, my piece of art is in the air! Well, the only problem is that the domain is .webflow.io. To change the domain, I would need a paid site plan. You can see the prices on Webflow.com and choose the best plan for your needs!
Conclusion
Although we dove into the essentials of this powerful program - from basic elements to adding dynamic content, your Webflow journey has just started, and there is much more to learn and do that we couldn't cover in this article. Webflow website creation is complicated but can also be interesting, so we recommend experimenting. Have some fun with it, and you will see that you will get better and better, and before you know it, you will be a Webflow expert! Also, don't forget to look into the Client-First Webflow program!
If you need a helping hand, Codelevate is a certified partner of Webflow, and we will do our very best to bring your dream website to reality!


.svg)


